Monday, February 1, 2010

Christmas 2009


First Grade
We got two Christmas projects in before break this year.
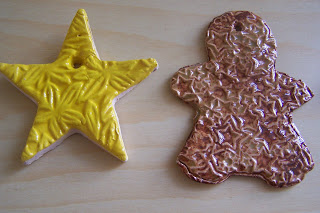
Ceramic Christmas Ornaments:
I pre rolled out all the slabs of clay. Students then used cookie cutters to cut out their shapes. They used texture plates to make all the designs on top. While those were being fired in the kiln we made salty snowmen. See photo and directions below.
When the ornaments came out of the kiln we glazed them and put them back in for the 2nd firing. The textures really gave the ornaments depth when the glazes settled into them.

* If you don't have a kiln you can always use air dry clay with tempera paint and then seal them with wood fairy.


Salty Snowmen
Blue sheet of construction paper
Oil pastels
white watercolor
salt
Easy ingredients, easy project. Students draw the snowman and background objects as they wish. Then paint white watercolor to fill in the snow areas. Sprinkle with salt. Add a little more white water color if necessary, and then let dry. The salt will absorb the water color making those areas more dense than others. This gives texture to the snow.

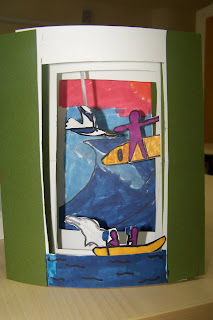
Pop Up Tunnel Book

Fourth Grade
When we came back from summer vacation I had the students create a visual tunnel book to tell about their favorite part of summer. People are always the hardest part for students to draw. We took a look at Keith Haring's artwork and went with that. These "books" got a lot of compliments and the students had fun making them too.
Sides: Fold an 8 1/2" x 12 " piece of colored construction paper like an accordion. Try to make sure the folds are straight and even. If there is extra on the last fold that is fine.
Pages: Fold a 8 1/2"x 6" white cardstock paper in half. Cut a rectangle out of the folded side leaving a 1 " boarder on all sides. Unfold. Do this for 3 sheets of cardstock. Leave the last one uncut. Glue the three pages into the first three accordion folds.
Scene: Draw the background on the last sheet that was not cut. Glue this into the last fold. Use the middle sections that you cut out of the white cardstock to draw your people and objects onto. Make your story come to life as you cut and glue each object into place.


Birdhouses


Preschool
This is a great project to practice shapes.
Background: Paint the background with water colors. Trying to make a sunset look.
Making the Bird: Trace a circle, an oval, and small triangle. Color them in with oil pastels. Cut them out. Glue them together with a glue stick.
Next class:
Making the Birdhouse: Each student chose a large rectangle (base of the house) a triangle (roof) and a long skinny rectangle (post). Assemble the pieces on the sunset background and glue them on. Use an oil pastel to draw a circle for the bird to go into. Glue the bird on.
Finishing touches: Use oil pastel to add trees, flowers, or more birds.


Followers