Monday, March 15, 2010
Terra Cotta Warrior Photo Book
My fourth grade students created a photo book to be sold at the auction. We used small figurines of the Terra Cotta Warriors, but you could use any small object. This is also a great lesson in proportion. I had the students bring their own cameras in and each class I took to a new location. We arranged the warriors in different positions around campus. I encouraged the students to get into the warriors world. You have to get dwon on their level to get more interesteing photos. I then selected the best photos to tell a little story of their adventures around our campus.
Toy Chest

This toy chest will also be sold at this year's auction. I painted all of these rectangles on to the wood with acriliyc paint. Then I had first grade students create fingerprint animals to put in each section. First they choose the color and added their fingerprint. We let it dry and then used sharpie markers to add in the details.
Monday, March 1, 2010
Handprint Cross
Each year our school hosts an auction to raise money for a certain area of our school and to donate to an underprivileged school in China. We often create art pieces with the students to sell at the auction. I helped create 3 of these pieces this year. This is the piece I created with the Preschool students. I used a thin piece of plywood and covered it with plaster to make the cross. One class added the gold by rubbing over the whole board. The next class used silver to make many tiny fingerprints. The last two classes made blue and purple handprints. 

Money Muncher Fish


 This was a great project for my first graders they loved getting messy in the paper mache and designing their own unique fish. I even had one octopus.
 Step 1: Blow up a balloon for each student ( I used a ballon pump)
Step 2: Using wall paper paste and strips of newspaper cover the whole balloon. We took two classes to make sure the fish would be solid. About 6 layers of newspaper should be good.
Step3: Make fins using hard card paper or cardboard. Tape them onto the newspaper.
Step4: I coated the fish with a primer to cover up the newspaper and tape.
Step5: Paint the whole fish using tempera paint.
Monday, February 1, 2010
Christmas 2009

First Grade
We got two Christmas projects in before break this year.
Ceramic Christmas Ornaments:
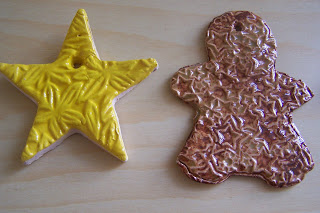
I pre rolled out all the slabs of clay. Students then used cookie cutters to cut out their shapes. They used texture plates to make all the designs on top. While those were being fired in the kiln we made salty snowmen. See photo and directions below.
When the ornaments came out of the kiln we glazed them and put them back in for the 2nd firing. The textures really gave the ornaments depth when the glazes settled into them.
* If you don't have a kiln you can always use air dry clay with tempera paint and then seal them with wood fairy.

Salty Snowmen
Blue sheet of construction paper
Oil pastels
white watercolor
salt
Easy ingredients, easy project. Students draw the snowman and background objects as they wish. Then paint white watercolor to fill in the snow areas. Sprinkle with salt. Add a little more white water color if necessary, and then let dry. The salt will absorb the water color making those areas more dense than others. This gives texture to the snow.
Pop Up Tunnel Book
Fourth Grade
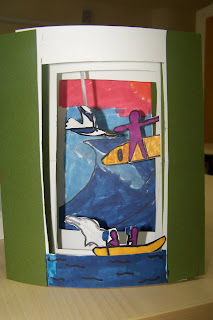
When we came back from summer vacation I had the students create a visual tunnel book to tell about their favorite part of summer. People are always the hardest part for students to draw. We took a look at Keith Haring's artwork and went with that. These "books" got a lot of compliments and the students had fun making them too.
Sides: Fold an 8 1/2" x 12 " piece of colored construction paper like an accordion. Try to make sure the folds are straight and even. If there is extra on the last fold that is fine.
Pages: Fold a 8 1/2"x 6" white cardstock paper in half. Cut a rectangle out of the folded side leaving a 1 " boarder on all sides. Unfold. Do this for 3 sheets of cardstock. Leave the last one uncut. Glue the three pages into the first three accordion folds.
Scene: Draw the background on the last sheet that was not cut. Glue this into the last fold. Use the middle sections that you cut out of the white cardstock to draw your people and objects onto. Make your story come to life as you cut and glue each object into place.


Birdhouses
Preschool
This is a great project to practice shapes.
Background: Paint the background with water colors. Trying to make a sunset look.
Making the Bird: Trace a circle, an oval, and small triangle. Color them in with oil pastels. Cut them out. Glue them together with a glue stick.
Next class:
Making the Birdhouse: Each student chose a large rectangle (base of the house) a triangle (roof) and a long skinny rectangle (post). Assemble the pieces on the sunset background and glue them on. Use an oil pastel to draw a circle for the bird to go into. Glue the bird on.
Finishing touches: Use oil pastel to add trees, flowers, or more birds.


Thursday, January 28, 2010
Georgia O'Keeffe Inspired Flowers
These Chalk Pastel Batik Flowers are easy and fun!
Every student can feel successful in their final product.
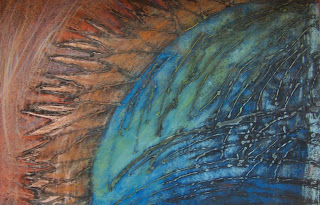
I did this project with my 3rd and 4th grade students. We started by looking at real and fake flowers, both work fine. Each student created their own viewfinder (cut a small rectangle 1/2" x 1" out of the center of a sheet of printer paper). The students then looked through the viewfinder holding it at arm's length away. This helped them to zoom in on small areas of the flowers like Georgia O'Keeffe did in her paintings. I told the students when you look through the viewfinder what you see is what you should draw on your paper. If you can not see it through the viewfinder you should not draw it. If the student still drew too much of the flower I made them choose an area and draw a rectangle around it. Then I had then enlarge that area to become their final abstract flower.
After getting the final image I had them transfer their drawing to a large black piece of paper.
The next step is to trace all of the pencil lines with a bottle of glue. It is important to keep the tip of the glue bottle on the paper and pull the glue bottle away from your line of glue keeping a nice steady flow of glue.
The next class when the glue has dried the students added color with the chalk pastels. The glue line acts as a barrier creating a batik look!


Labels:
batik,
Flower,
fourth grade,
O'Keeffe,
Third Grade
Subscribe to:
Comments (Atom)


